Troubleshooting Checklist
When your All-In-One has a problem, before contacting Lexmark Customer Support, check the following items:
- Is the power supply firmly attached to your All-In-One and a properly functioning electrical outlet?
- Are both your All-In-One and computer on?
- Is your USB cable securely attached to your All-In-One and to your computer or Lexmark adapter?
- Are any error messages displayed on the control panel? For help, see All-In-One displays error messages.
- Did you remove the sticker and transparent tape from the back and bottom of both print cartridges?
- Did you install the print cartridges correctly? For help, see Replacing the print cartridges.
- Is the paper loaded correctly? Make sure you do not push the paper too far into the All-In-One. For help, see Loading plain paper into the paper support.
- Is your operating system compatible with your All-In-One? The Lexmark 4200 Series supports these operating systems:
- Windows 98
- Windows Me
- Windows 2000
- Windows XP
9. Did you install the All-In-One software correctly?
From your desktop, click Start Programs or All Programs.
If Lexmark 4200 Series does not appear in your list of programs, install the All-In-One software.
10. Is the All-In-One set as the default printer?
To set the All-In-One to be the default printer:
- Click Start Settings Printers.
- Right-click the Lexmark 4200 Series and make sure that Set as Default is selected.
11. If you are using your All-In-One with your computer, is your All-In-One connected directly to your computer? If it is connected through an external device, such as a USB hub or switch box, follow these steps:
- Disconnect your All-In-One from any external devices.
- Connect your All-In-One directly to your computer with a USB cable.
- Follow these instructions to print a test page.
a. Open the Lexmark Solution Center. For help, see Using the Lexmark Solution Center.
b. From the Maintenance tab, click Print a Test Page.
- If the test page prints, the problem may be with your external devices, not your All-In-One. Check the documentation that came with your external devices for help.
- If the test page does not print, refer to the All-In-One software Help for further troubleshooting information.
Setup Troubleshooting
Document Does Not Print
1. Make sure you removed the sticker and tape from the bottom of the print cartridges. For help, see Replacing the print cartridges.
2. Make sure the cartridges are properly installed. For help, see Replacing the print cartridges.
3. Make sure you loaded the paper correctly. For help, see Loading plain paper into the paper support.
4. Use an undamaged USB cable.
5. Check your All-In-One status to make sure your document is not being held or paused.
To check All-In-One status:
- Click Start Settings Printers.
- Double-click the Lexmark 4200 Series icon, and then click Printer.
- Make sure no check mark appears next to Pause Printing.
- Print a test page.
6. Check the software program.
Document Prints Slowly
1. Close programs not in use.
2. Reduce the print quality resolution (Quick and Normal print more quickly than Better and Best).
Note: Photos or documents containing graphics may take longer to print than regular text.
3. Consider purchasing more Random Access Memory (RAM) for your computer.
Document misfeeds or jams
Paper misfeeds or multiple sheets feed
1. Use a paper recommended for inkjet printers.
2. Do not force the paper into the All-In-One.
3. Do not load too much paper into the All-In-One. For help, see Load up to:.
4. Make sure the paper guide rests against the left edge of the paper and does not cause the paper to bow in the paper support.
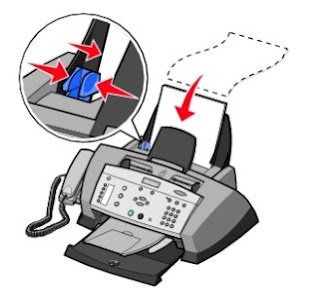
5. Place the All-In-One on a flat, level surface.
6. Select the correct paper type and size.